Monday, March 7, 2011

Creating a "Bullet-time" Shader

I spent last weekend putting together a shader that would give the impression of time slowing down - an effect that I recently found the need for as I started adding new mechanics to the game (Biff! Bam!! Blammo!?!) I've been working on for the past 2+ years in my spare time.

My goal was to give a strong impression of the slowed-down motion of the ball in the game - this effect will become active whenever a player wants to 'boost' the ball. Players are given a certain number of boosts (which replenish over time) and when the player initiates the boosting mechanism (by using the right analog stick on a controller, or the arrow keys on the keyboard) bullet-time becomes activated and as a result gives time for the player to boost in the direction of their choice.

From previous movie going and videogame playing experience it's pretty obvious that the best visual cues used to make "bullet-time" happen are to desaturate and blur large parts of the scene. Since the focus of the bullet-time for my game is on the ball(s), I figured a radial blur would be the most appropriate.

For the desaturation effect a simple linear interpolation between a fully coloured scene and the mean average of the red, green and blue colour channels sufficed.

For the radial blur effect I was able to find some code here, which helped a lot - I converted it to CgFx and made some small tweaks.

I ended up adding another effect, which admittedly covers up a problem with the radial blur when you zoom in with a camera. The problem being that the radial blur effect causes ghost images/incorrect blurring around the screen edges as the camera zooms - the problem totally stumped me; it doesn't seem to have anything to do with the texture mapping mode (e.g., changing the mode to clamp/repeat/etc. has little to no effect); if someone can figure out what the actual problem is I would be interested to know. I attempted two solutions:

The first was to actually draw the fullscreen quad (after rendering the blurred scene to a texture) slightly larger than it actually was but maintaining the same texture coordinates (thus 'zooming' in on the image without changing the resolution) - this has obvious setbacks concerning the loss of resolution and I wasn't really pleased with the visual results - also it was a very fidgety solution - I had to tweak the amount larger that the fullscreen quad was in order to get rid of the ugly blur borders, in the end it all felt very hacky and I gave up on it.

The second method was to cover up the problem almost entirely - or at the very least take the player's attention away from the problem. This was done by darkening the edges of the screen by performing a smoothstep interpolation between zero (around the edges) to one (at the center) and then multiplying the colour by that value. This ended up working surprisingly well; though the problem still persists, it's arguably negligible now.

I've included the full shader code below.

 // Constant samples used in the radial blur
const float SAMPLES[10] = 
{-0.08, -0.05, -0.03, -0.02, -0.01, 
  0.01, 0.02, 0.03, 0.05, 0.08};
/*
 * For a value of zero the full colour of the scene is displayed,
 * for a value of one the entire scene will be in black and  
 * white, in between values are lerped.
 */
float DesaturateFraction <
    string UIWidget = "slider";
    float UIMin = 0.0;
    float UIMax = 1.0;
    float UIStep = 0.01;
    string UIName =  "Desaturation";
> = 0.0f;
/*
 * SampleDistance will break-up the sampling of the blur if it is made too high,
 * resulting in a very discretized and and poorly sampled blur. However, if made
 * high enough it will also result in a very strong blur.
 */
float SampleDistance <
    string UIWidget = "slider";
    float UIMin = 0.0;
    float UIMax = 2.0;
    float UIStep = 0.01;
    string UIName =  "Sample Distance";
> = 0.25f;
/*
 * SampleStrength is how much of the blur actually shows - this will be weighted
 * away from the center i.e., the center will always show the least amount of blur
 * unless SampleStrength is very high.
 */
float SampleStrength <
    string UIWidget = "slider";
    float UIMin = 0.0;
    float UIMax = 35.0;
    float UIStep = 0.01;
    string UIName =  "Sample Strength";
> = 2.1f;
// Texture and Sampler of the currently rendered scene
texture SceneTex <
    string ResourceName = "EarthDay.dds";
    string UIName = "Scene Texture";
    string ResourceType = "2D";
>;
sampler2D SceneSampler = sampler_state {
    Texture = ;   
    WrapS = ClampToEdge;
    WrapT = ClampToEdge;   
};


/**
 * Radial blur function, makes use of the current texture coordinate
 * to look up the current fragment colour and do a radial blur on it by
 * sampling away from the pixel in the direction of the center of the screen.
 * Executes a post-processing radial blur on a given fullscreen texture.
 * The two important tweakable parameters are SampleDistance and SampleStrength.
 */
float4 ToRadialBlur(float4 sceneColour, float2 UV) {
  float2 blurDirection = float2(0.5f, 0.5f) - UV;
float  blurLength    = length(blurDirection);
blurDirection = blurDirection/blurLength;

// Calculate the average colour along the radius towards the center
float4 sum = sceneColour;
for (int i = 0; i < 10; i++) {
sum += tex2D(SceneSampler, UV + (blurDirection * SAMPLES[i] * SampleDistance));
}
sum /= 11.0f;


// Weight the amount of 
float weightedAmt = blurLength * SampleStrength;
weightedAmt = saturate(weightedAmt);

return lerp(sceneColour, sum, weightedAmt) * smoothstep(1, 0, saturate(1.1f * blurLength));
}
/**
 * Black and White conversion function that desaturates a given colour.
 */
float4 ToBlackAndWhite(float3 sceneColour) {
float  sceneTone   = (sceneColour.r + sceneColour.g + sceneColour.b) / 3.0f;
float3 finalColour = lerp(sceneColour, float3(sceneTone), DesaturateFraction);
return float4(finalColour, 1.0f);
}
float4 PostBallBulletTimePS(float2 UV : TEXCOORD0) : COLOR {
float4 sceneColour        = tex2D(SceneSampler, UV).rgba;
float4 blurredSceneColour = ToRadialBlur(sceneColour, UV);
return ToBlackAndWhite(blurredSceneColour.rgb);
}
technique PostBulletTime {
    pass p0 {
        FragmentProgram = compile arbfp1 PostBallBulletTimePS();
    }
}


A picture of the "Bullet-time" effect in action.


Monday, October 18, 2010

Decomposing Affine Transforms

There's no 'perfect' way to decompose a 4x4 affine transform matrix into its completely exact, initial component matrices (i.e., rotation, scale, translation) in all cases. However there are some pretty useful techniques when you know that you're transform only has particular types of component transforms inside it and if you're willing to accept the fact that you won't get an exact version of those transforms back after decomposition. Specifically, the scale and rotation components of the transform will become 'mixed' this is mainly due to the isomorphism between the effects of certain scale operations and rotation operations.

For example: For a scale in 3D space, if any two components are negative and the third is positive, a rotation can be found to exactly mimic the behaviour of the 'flipping' portion of that scale operation. That is, the rotation would mimic the scale exactly if the scale was still a unit scale (e.g., scale along x,y and z was 1, -1, -1). In fact there's a general rule where the sign (+/-) of the scale only matters if the total number of signed components is odd (in which case a rotation cannot accommodate the 'flipping' aspect of the scale).

The following are some required methods for properly analyzing and decomposing a 4x4 affine transform matrix:

This first method gets the determinant of a 4x4 matrix, this is required for detecting whether there's a odd negative scale (i.e., the determinant is less than zero) and also for detecting whether a matrix is invertible (i.e., the determinant is approximately equal to zero).

/**
 * @brief  Get the determinant of this matrix.
 * @return The determinant.
 */
template <typename T> T Matrix4x4<T>::Determinant() const {
#define MINOR(m, r0, r1, r2, c0, c1, c2) \
((m).rows[r0][c0] * ((m).rows[r1][c1] * (m).rows[r2][c2] - (m).rows[r2][c1] * (m).rows[r1][c2]) - \
(m).rows[r0][c1] * ((m).rows[r1][c0] * (m).rows[r2][c2] - (m).rows[r2][c0] * (m).rows[r1][c2]) + \
(m).rows[r0][c2] * ((m).rows[r1][c0] * (m).rows[r2][c1] - (m).rows[r2][c0] * (m).rows[r1][c1]))

    return this->rows[0][0] * MINOR(*this, 1, 2, 3, 1, 2, 3) -
           this->rows[0][1] * MINOR(*this, 1, 2, 3, 0, 2, 3) +
           this->rows[0][2] * MINOR(*this, 1, 2, 3, 0, 1, 3) -
           this->rows[0][3] * MINOR(*this, 1, 2, 3, 0, 1, 2);

    #undef MINOR
}

The next method can determine whether the 4x4 matrix is an appropriate, invertible affine transform or not. If you can afford the extra computation then this ensures that we can even begin to decompose the matrix.
Note that a right-handed 4x4 matrix is said to be affine if it meets the following set of necessary and sufficient conditions:

a) The matrix follows the form


b) There exists an inverse and it is the following matrix:


/**
 * @brief Determine whether this matrix represents an affine transform or not.
 * @return true if this matrix is an affine transform, false if not.
 */
template <typename T> bool Matrix4x4<T>::IsAffine() const {
    // First make sure the bottom row meets the condition that it is (0, 0, 0, 1)
    if (!Vector4D<T>::Equals(this->GetRow(3), Vector4D<T>(0.0, 0.0, 0.0, 1.0))) {
        return false;
    }

    // Get the inverse of this matrix:
    // Make sure the matrix is invertible to begin with...
    if (fabs(this->Determinant()) <= get_error_epsilon<T>()) {
        return false;
    }

    // Calculate the inverse and seperate the inverse translation component 
    // and the top 3x3 part of the inverse matrix
    Matrix4x4<T> inv4x4Matrix = Matrix4x4<T>::Inverse(*this);
    Vector3D<T> inv4x4Translation(inv4x4Matrix.rows[0][3],
                                        inv4x4Matrix.rows[1][3],
                                        inv4x4Matrix.rows[2][3]);
    Matrix3x3<T> inv4x4Top3x3 = Matrix4x4<T>::ToMatrix3x3(inv4x4Matrix);

    // Grab just the top 3x3 matrix
    Matrix3x3<T> top3x3Matrix     = Matrix4x4<T>::ToMatrix3x3(*this);
    Matrix3x3<T> invTop3x3Matrix  = Matrix3x3<T>::Inverse(top3x3Matrix);
    Vector3D<T> inv3x3Translation = -(invTop3x3Matrix * this->GetTranslation());

    // Make sure we adhere to the conditions of a 4x4 invertible affine transform matrix
    if (!Matrix3x3<T>::Equals(inv4x4Top3x3, invTop3x3Matrix)) {
        return false;
    }
    if (!Vector3D<T>::Equals(inv4x4Translation, inv3x3Translation)) {
        return false;
    }

    return true;
}

Under the assumption that we're dealing with an invertible homogeneous 4x4 affine transform matrix, (with both of the above functions considered) we can now safely decompose our matrix into its scale, rotation and translation components:

/**
 * @brief Decomposes the given matrix 'm' into its translation, rotation and scale components.
 * @param m The matrix to decompose.
 * @param translation [in,out] The resulting translation component of m.
 * @param rotation [in,out] The resulting rotation component of m.
 * @param scale [in,out] The resulting scale component of m.
 */
template <typename T> 
void Matrix4x4<T>::Decompose(const Matrix4x4<T>& m, 
                                   Vector3D<T>& translation, 
                                   Matrix4x4<T>& rotation, 
                                   Vector3D<T>& scale) {
    // Copy the matrix first - we'll use this to break down each component
    Matrix4x4<T> mCopy(m);

    // Start by extracting the translation (and/or any projection) from the given matrix
    translation = mCopy.GetTranslation();
    for (int i = 0; i < 3; i++) {
        mCopy.rows[i][3] = mCopy.rows[3][i] = 0.0;
    }
    mCopy.rows[3][3] = 1.0;

    // Extract the rotation component - this is done using polar decompostion, where
    // we successively average the matrix with its inverse transpose until there is
    // no/a very small difference between successive averages
    T norm;
    int count = 0;
    rotation = mCopy;
    do {
        Matrix4x4<T> nextRotation;
        Matrix4x4<T> currInvTranspose = 
          Matrix4x4<T>::Inverse(Matrix4x4<T>::Transpose(rotation));
        
        // Go through every component in the matrices and find the next matrix
        for (int i = 0; i < 4; i++) {
            for (int j = 0; j < 4; j++) {
                nextRotation.rows[i][j] = static_cast<T>(0.5 * 
                  (rotation.rows[i][j] + currInvTranspose.rows[i][j]));
            }
        }

        norm = 0.0;
        for (int i = 0; i < 3; i++) {
            float n = static_cast<float>(
                         fabs(rotation.rows[i][0] - nextRotation.rows[i][0]) +
                         fabs(rotation.rows[i][1] - nextRotation.rows[i][1]) +
                         fabs(rotation.rows[i][2] - nextRotation.rows[i][2]));
            norm = std::max<T>(norm, n);
        }
        rotation = nextRotation;
    } while (count < 100 && norm > blackbox::bbmath::get_error_epsilon<T>());

    // The scale is simply the removal of the rotation from the non-translated matrix
    Matrix4x4<T> scaleMatrix = Matrix4x4<T>::Inverse(rotation) * mCopy;
    scale = Vector3D<T>(scaleMatrix.rows[0][0],
                        scaleMatrix.rows[1][1],
                        scaleMatrix.rows[2][2]);

    // Calculate the normalized rotation matrix and take its determinant to determine whether
    // it had a negative scale or not...
    Vector3D<T> row1(mCopy.rows[0][0], mCopy.rows[0][1], mCopy.rows[0][2]);
    Vector3D<T> row2(mCopy.rows[1][0], mCopy.rows[1][1], mCopy.rows[1][2]);
    Vector3D<T> row3(mCopy.rows[2][0], mCopy.rows[2][1], mCopy.rows[2][2]);
    row1.Normalize();
    row2.Normalize();
    row3.Normalize();
    Matrix3x3<T> nRotation(row1, row2, row3);

    // Special consideration: if there's a single negative scale 
    // (all other combinations of negative scales will
    // be part of the rotation matrix), the determinant of the 
    // normalized rotation matrix will be < 0. 
    // If this is the case we apply an arbitrary negative to one 
    // of the component of the scale.
    T determinant = nRotation.Determinant();
    if (determinant < 0.0) {
        scale.SetX(scale.GetX() * -1.0);
    }
}

Note the last few lines of the Decompose function. If we find it to be the case that the 'normalized' rotation matrix has a determinant that is less than zero, then we know that there's at least one component of the scale that's negative; however, we cannot know which one. Fortunately that previous sentence is somewhat meaningless anyway, since the original matrix we were given could have been composed of tons of previous affine transforms and the meaning of its 'original' scale becomes a bit of a misnomer. Ultimately what this means is that as long as we know there is a negative scale, we can assign it to any single component of the decomposed scale and still be correct as long as the other decomposed elements are considered along with it.

Tuesday, September 21, 2010

Gaussian Blur Shader (GLSL)

A Gaussian blur is one of the most useful post-processing techniques in graphics yet I somehow find myself hard pressed to find a good example of a Gaussian blur shader floating around on the interwebs. I've included below a very flexible, separable Gaussian blur shader in GLSL. The theory behind its value generation can be found in GPU Gems 3; Chapter 40 ("Incremental Computation of the Gaussian" by Ken Turkowski).

Here's the extremely simple vertex shader; the assumption being that you'll be feeding a fullscreen quad to the vertex shader such that it's 4 vertices are positioned at the corners of the viewport:
void main() {
gl_Position = gl_ModelViewProjectionMatrix * gl_Vertex;
gl_TexCoord[0] = gl_MultiTexCoord0;
}
The fragment shader is setup using macros separated based on the blur direction (i.e., horizontal/vertical) and the blur kernel size (currently 5, 7 and 9; but this can easily be extended). Here's the fragment shader:

uniform float sigma; // The sigma value for the gaussian function: higher value means more blur
// A good value for 9x9 is around 3 to 5
// A good value for 7x7 is around 2.5 to 4
// A good value for 5x5 is around 2 to 3.5
// ... play around with this based on what you need :)

uniform float blurSize; // This should usually be equal to
// 1.0f / texture_pixel_width for a horizontal blur, and
// 1.0f / texture_pixel_height for a vertical blur.

uniform sampler2D blurSampler; // Texture that will be blurred by this shader

const float pi = 3.14159265f;

// The following are all mutually exclusive macros for various
// seperable blurs of varying kernel size
#if defined(VERTICAL_BLUR_9)
const float numBlurPixelsPerSide = 4.0f;
const vec2 blurMultiplyVec = vec2(0.0f, 1.0f);
#elif defined(HORIZONTAL_BLUR_9)
const float numBlurPixelsPerSide = 4.0f;
const vec2 blurMultiplyVec = vec2(1.0f, 0.0f);
#elif defined(VERTICAL_BLUR_7)
const float numBlurPixelsPerSide = 3.0f;
const vec2 blurMultiplyVec = vec2(0.0f, 1.0f);
#elif defined(HORIZONTAL_BLUR_7)
const float numBlurPixelsPerSide = 3.0f;
const vec2 blurMultiplyVec = vec2(1.0f, 0.0f);
#elif defined(VERTICAL_BLUR_5)
const float numBlurPixelsPerSide = 2.0f;
const vec2 blurMultiplyVec = vec2(0.0f, 1.0f);
#elif defined(HORIZONTAL_BLUR_5)
const float numBlurPixelsPerSide = 2.0f;
const vec2 blurMultiplyVec = vec2(1.0f, 0.0f);
#else
// This only exists to get this shader to compile when no macros are defined
const float numBlurPixelsPerSide = 0.0f;
const vec2 blurMultiplyVec = vec2(0.0f, 0.0f);
#endif

void main() {

// Incremental Gaussian Coefficent Calculation (See GPU Gems 3 pp. 877 - 889)
vec3 incrementalGaussian;
incrementalGaussian.x = 1.0f / (sqrt(2.0f * pi) * sigma);
incrementalGaussian.y = exp(-0.5f / (sigma * sigma));
incrementalGaussian.z = incrementalGaussian.y * incrementalGaussian.y;

vec4 avgValue = vec4(0.0f, 0.0f, 0.0f, 0.0f);
float coefficientSum = 0.0f;

// Take the central sample first...
avgValue += texture2D(blurSampler, gl_TexCoord[0].xy) * incrementalGaussian.x;
coefficientSum += incrementalGaussian.x;
incrementalGaussian.xy *= incrementalGaussian.yz;

// Go through the remaining 8 vertical samples (4 on each side of the center)
for (float i = 1.0f; i <= numBlurPixelsPerSide; i++) {
avgValue += texture2D(blurSampler, gl_TexCoord[0].xy - i * blurSize *
blurMultiplyVec) * incrementalGaussian.x;
avgValue += texture2D(blurSampler, gl_TexCoord[0].xy + i * blurSize *
blurMultiplyVec) * incrementalGaussian.x;
coefficientSum += 2 * incrementalGaussian.x;
incrementalGaussian.xy *= incrementalGaussian.yz;
}

gl_FragColor = avgValue / coefficientSum;
}

Monday, November 24, 2008

Render-to-Texture and 2D Lookup Refraction

This post will be a discussion on rendering to texture in OpenGL and using that texture in a shader to perform a pseudo-refraction on a 3D mesh in the foreground of the scene.

Rendering to texture can be done using OpenGL's framebuffer extension. I find it easiest to write an object that wraps up this functionality in a singleton manager which can be used anywhere in the code. The constructor creates the framebuffer object (FBO) as well as any other render objects required (e.g., for storing depth). The destructor cleans up these objects and the rest of the singleton provides functions for initializing a render-to-texture, binding the FBO, unbinding the FBO and checking for errors. I've posted the code for the FBOManager.cpp file below:

FBOManager* FBOManager::instance = NULL;

FBOManager::FBOManager() : fboID(0), renderBuffID(0) {
// Init the framebuffer and renderbuffer ID for binding,
// but don't bind the FBO just yet
glGenFramebuffersEXT(1, &this->fboID);
glGenRenderbuffersEXT(1, &this->renderBuffID);
}

FBOManager::~FBOManager() {
glDeleteFramebuffersEXT(1, &this->fboID);
glDeleteRenderbuffersEXT(1, &this->renderBuffID);
}

/**
* Setup the Framebuffer object to render to a specific
* texture type with a specific texture ID
* at a given height and width - call this BEFORE binding.
* Returns: true on success, false otherwise.
*/
bool FBOManager::SetupFBO(Texture& texture) {
texture.BindTexture();

glBindFramebufferEXT(GL_FRAMEBUFFER_EXT, this->fboID);
glBindRenderbufferEXT(GL_RENDERBUFFER_EXT,
this->renderBuffID);

glRenderbufferStorageEXT(GL_RENDERBUFFER_EXT,
GL_DEPTH_COMPONENT,texture.GetWidth(), texture.GetHeight());
glFramebufferRenderbufferEXT(GL_FRAMEBUFFER_EXT,
GL_DEPTH_ATTACHMENT_EXT, GL_RENDERBUFFER_EXT,
this->renderBuffID);
glFramebufferTexture2DEXT(GL_FRAMEBUFFER_EXT,
GL_COLOR_ATTACHMENT0_EXT, texture.GetTextureType(),
texture.GetTextureID(), 0);

GLenum buffers[] = { GL_COLOR_ATTACHMENT0_EXT };
glDrawBuffers(1, buffers);

glBindFramebufferEXT(GL_FRAMEBUFFER_EXT, 0);

texture.UnbindTexture();

// Make sure everything FBO is good to go
return this->CheckFBOStatus();
}

/**
* Private helper function that checks the status of the FBO
* and reports any errors.
* Returns: true on successful status, false if badness.
*/
bool FBOManager::CheckFBOStatus() {
int status = glCheckFramebufferStatusEXT(GL_FRAMEBUFFER_EXT);
if (status != GL_FRAMEBUFFER_COMPLETE_EXT) {
switch (status) {
case GL_FRAMEBUFFER_INCOMPLETE_ATTACHMENT_EXT:
debug_output("Framebuffer Object error detected:
Incomplete attachment.");
break;
case GL_FRAMEBUFFER_INCOMPLETE_DIMENSIONS_EXT:
debug_output("Framebuffer Object error detected:
Incomplete dimensions.");
break;
case GL_FRAMEBUFFER_INCOMPLETE_DRAW_BUFFER_EXT:
debug_output("Framebuffer Object error detected:
Incomplete draw buffer.");
break;
case GL_FRAMEBUFFER_INCOMPLETE_FORMATS_EXT:
debug_output("Framebuffer Object error detected:
Incomplete formats.");
break;
case GL_FRAMEBUFFER_INCOMPLETE_LAYER_COUNT_EXT:
debug_output("Framebuffer Object error detected:
Incomplete layer count.");
break;
case GL_FRAMEBUFFER_INCOMPLETE_LAYER_TARGETS_EXT:
debug_output("Framebuffer Object error detected:
Incomplete layer targets.");
break;
case GL_FRAMEBUFFER_INCOMPLETE_MISSING_ATTACHMENT_EXT:
debug_output("Framebuffer Object error detected:
Incomplete, missing attachment.");
break;
case GL_FRAMEBUFFER_INCOMPLETE_MULTISAMPLE_EXT:
debug_output("Framebuffer Object error detected:
Incomplete multisample.");
break;
case GL_FRAMEBUFFER_INCOMPLETE_READ_BUFFER_EXT:
debug_output("Framebuffer Object error detected:
Incomplete read buffer.");
break;
case GL_FRAMEBUFFER_UNSUPPORTED_EXT:
debug_output("Framebuffer Object error detected:
Framebuffer unsupported.");
break;
default:
debug_output("Framebuffer Object error detected:
Unknown Error");
break;
}
return false;
}
return true;
}

And here's the code for using the FBOManager:

bool success = FBOManager::GetInstance()->SetupFBO(
*this->renderToTexBeforeBall);
assert(success);
FBOManager::GetInstance()->BindFBO();

// Draw the stuff you want rendered into a texture here ...

FBOManager::GetInstance()->UnbindFBO();
this->renderToTexBeforeBall->RenderTextureToFullscreenQuad();

For the game I've been building, I rendered just the background into the texture - this would provide later effects shaders with the ability to look-up into the background and do neat effects (I was specifically aiming for refraction). Here's a picture of what the render-to-texture looked like when placed on a full screen quad:


And here is the code used to render the quad with the scene texture:

void Texture2D::RenderTextureToFullscreenQuad() {
glPushAttrib(GL_VIEWPORT_BIT | GL_TEXTURE_BIT |
GL_LIGHTING_BIT | GL_LIST_BIT | GL_CURRENT_BIT |
GL_ENABLE_BIT | GL_TRANSFORM_BIT | GL_COLOR_BUFFER_BIT |
GL_DEPTH_BUFFER_BIT);

glPushAttrib(GL_TRANSFORM_BIT);
GLint viewport[4];
glGetIntegerv(GL_VIEWPORT, viewport);
glMatrixMode(GL_PROJECTION);
glPushMatrix();
glLoadIdentity();
gluOrtho2D(viewport[0],viewport[2],viewport[1],viewport[3]);
glPopAttrib();

glDisable(GL_DEPTH_TEST);
glDisable(GL_LIGHTING);
glDisable(GL_BLEND);
glCullFace(GL_BACK);
glEnable(GL_CULL_FACE);
glPolygonMode(GL_FRONT, GL_FILL);

glMatrixMode(GL_MODELVIEW);
glPushMatrix();
glLoadIdentity();

// Bind the texture and draw the full screen quad
this->BindTexture();

// Set the appropriate parameters for rendering
// the single fullscreen quad
glTexParameteri(GL_TEXTURE_2D, GL_TEXTURE_WRAP_S, GL_CLAMP);
glTexParameteri(GL_TEXTURE_2D, GL_TEXTURE_WRAP_T, GL_CLAMP);
glTexEnvf(GL_TEXTURE_ENV, GL_TEXTURE_ENV_MODE, GL_REPLACE);
Texture::SetFilteringParams(Texture::Nearest, GL_TEXTURE_2D);

glColor4f(1.0f, 1.0f, 1.0f, 1.0f);
glBegin(GL_QUADS);
glTexCoord2i(0, 0); glVertex2i(0, 0);
glTexCoord2i(1, 0); glVertex2i(this->width, 0);
glTexCoord2i(1, 1); glVertex2i(this->width, this->height);
glTexCoord2i(0, 1); glVertex2i(0, this->height);
glEnd();
this->UnbindTexture();

glPopMatrix();
glPopAttrib();

glPushAttrib(GL_TRANSFORM_BIT);
glMatrixMode(GL_PROJECTION);
glPopMatrix();
glPopAttrib();
}

Using the background rendered to texture I could then produce a pseudo-refraction or displacement effect with the in-game ball (for when the user obtains the "invisi-ball" power-down item). I figured a good way to do this would be to use the normals of the ball to do an offset look-up into the scene texture within a pixel shader (I can also later modify this to use normal maps). I've posted the entire cgfx file below:

/**
* PostRefract.cgfx
* Author: Callum Hay
* The following is a post-processing effect that
* will take a given geometry and, using its normals,
* distort the given rendered scene quad in the area
* where that mesh would normally be rendered -
* the effect of this is a kind of 'cloaking/invisiblity'
* of the mesh.
*/

//// UN-TWEAKABLES - AUTOMATICALLY-TRACKED TRANSFORMS ///////
float4x4 WorldITXf;
float4x4 WvpXf;
float4x4 WorldXf;
float4x4 ViewIXf;

//// TWEAKABLE PARAMETERS ////////////
float WarpAmount;
float SceneWidth;
float SceneHeight;
float IndexOfRefraction;
float3 InvisiColour;

//////// TEXTURE /////////////////////
texture SceneTexture;
sampler2D SceneSampler = sampler_state {
Texture = ;
WrapS = ClampToEdge;
WrapT = ClampToEdge;
MinFilter = LinearMipMapLinear;
MagFilter = Linear;
};

//////// CONNECTOR DATA STRUCTURES ///////////

/* data from application vertex buffer */
struct appdata {
float3 Position : POSITION;
float4 UV : TEXCOORD0;
float4 Normal : NORMAL;
};

/* data passed from vertex shader to pixel shader */
struct vertexOutput {
float4 HPosition : POSITION;
float3 WorldNormal : TEXCOORD0;
float3 ProjPos : TEXCOORD1;
float3 WorldView : TEXCOORD2;
};

///////// VERTEX SHADING /////////////////////

vertexOutput PostRefract_VS(appdata IN) {
vertexOutput OUT = (vertexOutput)0;

float4 Po = float4(IN.Position.xyz,1);
float3 Pw = mul(WorldXf,Po).xyz;

float3 worldNormal = mul(WorldITXf,IN.Normal).xyz;
float3 viewToVert = Pw - float3(ViewIXf[0].w,ViewIXf[1].w,
ViewIXf[2].w);

OUT.WorldNormal = normalize(worldNormal);
OUT.WorldView = normalize(viewToVert);
float4 outPos = mul(WvpXf,Po);
OUT.HPosition = outPos;
OUT.ProjPos = outPos.xyz / outPos.w;
return OUT;
}

///////// PIXEL SHADING //////////////////////

float4 PostRefract_PS(vertexOutput IN) : COLOR {
float3 nWorldView = normalize(IN.WorldView.xyz);
float3 nWorldNormal = normalize(IN.WorldNormal.xyz);
float3 nProjPos = (IN.ProjPos.xyz + float3(1,1,1)) * 0.5;

// This is a hacked version of the Fresnel effect -
// it has fixed constants of 0.5 for the bias, 1
// for the Scale and 1 for the power
// The reasoning is that I want a nicely blended bit of
// both reflection and refraction especially in cases
// of total internal refraction (which looks ugly and
// abrupt without this)
float reflectionCoeff = max(0, min(1, 1.5f +
dot(nWorldView,nWorldNormal)));

// Find the world space reflection vector
float3 reflectionVec = reflect(nWorldView, nWorldNormal);
// Find the world space refraction vector
// (IndexOfRefraction_Medium to air)
float3 refractionVec = refract(nWorldView, nWorldNormal,
IndexOfRefraction/1.0003);

// Obtain the lookup vector which will
// be scaled/warped to get an offset for
// looking up the background/scene texture
float2 lookupVec = reflectionCoeff*reflectionVec.xy +
(1-reflectionCoeff)*refractionVec.xy;

// Use the refraction and scale it to the screen
// size to get an offset for looking up the texel
// in the scene texture
float2 lookupOffset = WarpAmount * lookupVec.xy *
float2(1.0/SceneWidth, 1.0/SceneHeight);
float3 textureColour = tex2D(SceneSampler, nProjPos.xy +
lookupOffset).rgb;

return float4(InvisiColour*textureColour, 1.0f);
}

///// TECHNIQUES /////////////////////////////
technique PostRefractGeom {
pass p0 < script = "Draw=geometry;"> {
BlendEnable = true;
DepthTestEnable = true;
DepthFunc = LEqual;
CullFaceEnable = true;
CullFace = Back;
PolygonMode = int2(Front, Fill);

VertexProgram = compile vp40 PostRefract_VS();
FragmentProgram = compile fp40 PostRefract_PS();
}
}

It's definitely noticeable when calculating the texture look-up in the pixel shader just how much I fudged the refraction - it's a very simple offset procedure with a very tweakable "WarpAmount" parameter, but with great results.
I find that an index of refraction of about 1.33 (water) and a warp amount around 50 gives a really nice "cloaking" effect (see the image below).

Tuesday, June 17, 2008

Skyboxes

The skybox (or dome, sphere, etc.) will play an important role in the game I'm building as it will serve to further immerse the player in the stylized world of the game. From what my limited knowledge can say there are a variety of ways to accomplish a "skybox" effect, from the simplicity of pasting textures onto a very large set of polygons at the borders of the level/world to pre-rendering miniature models and using cube maps to give a greater illusion of depth (wikipedia has a pretty good entry about this).

So how exactly did I create my skybox?
First of all, I'm using a skysphere (however, I'll keep referring to it as a skybox anyway) - it looks a lot nicer. Though, the sphere is a pretty jagged one, it has only 72 faces.

Here is picture of the texture I used for the skybox:


And here is the CgFx shader code for displaying it:
float4x4 ModelViewProjXf;
float4x4 WorldXf;
float3 SkyCamPos;

float3 MultiplyColour <
> = {1.0f,1.0f,1.0f};

texture skyEnvMap : Environment <
string ResourceType = "Cube";
>;

samplerCUBE SkyboxSampler = sampler_state {
Texture = < skyEnvMap >;
WrapS = ClampToEdge;
WrapT = ClampToEdge;
WrapR = ClampToEdge;
};

// application to vertex shader -----------------
struct appdata {
float3 Position : POSITION;
};

// vertex shader to pixel shader ----------------
struct vertexOutput {
float4 HPosition : POSITION;
float3 WorldView : TEXCOORD0;
};

// Vertex Shader --------------------------------
vertexOutput skybox_VS(appdata IN) {
vertexOutput OUT = (vertexOutput)0;
float4 Pos = float4(IN.Position.xyz,1);
float3 Pw = mul(WorldXf,Pos).xyz;
OUT.HPosition = mul(ModelViewProjXf,Pos);
OUT.WorldView = normalize(Pw -
float3(SkyCamPos.x,SkyCamPos.y,SkyCamPos.z));
return OUT;
}

// Fragement Shader (Floating Point) ------------
float4 skybox_PS(vertexOutput IN) : COLOR {
// All we need to do is a look up in the cube map
// using the vector from the eye to the fragment...
float3 SkyColour = texCUBE(SkyboxSampler, IN.WorldView).xyz;
return float4(SkyColour * MultiplyColour, 1.0f);
}

technique Skybox
{
pass pass0
{
CullFaceEnable = true;
CullFace = Back;
DepthTestEnable = true;
DepthFunc = LEqual;

VertexProgram = compile vp40 skybox_VS();
FragmentProgram = compile fp40 skybox_PS();
}
}
The skybox is a spherical polygon mesh that's loaded into the game engine, I then have a very specific effect (the above "Skybox.cgfx" shader), which I apply to that mesh. The shader does the texture mapping for the skybox by doing a look-up in a given cubemap. In the case of the "Deco" level of the game, the cube map has just one texture applied to all 6 faces of the cube. The "SkyCamPos" variable defines the center of the skybox - this is the location from which the 'rays' shoot out and sample the cubemap, giving the illusion that the skybox is very far away since it will always remain stationary to the viewer. I should note here that some skybox techniques like those used in Valve's Source engine allow for a very small amount of skybox movement as the viewer moves - I considered this but since the game is mostly stationary it's really not necessary.

The "MultiplyColour" variable is used to multiply the colour of the cubemap texel look-up with some specified colour in the game code. In the case of the "Deco" world, the colour is constantly shifting between a set of established colours. I do this with the following code:
// Figure out what the colour of the background should be...
double colourChangeInc = dT * COLOUR_CHANGE_SPEED;
Colour nextColour = COLOUR_CHANGE_LIST[
(this->currColourIndex + 1) % NUM_COLOUR_CHANGES];
bool transitionDone = true;

// Find out if there is a significant difference
// in each colour channel, if there is then move
// towards the next target colour in that channel
if (fabs(currColour.R() - nextColour.R()) >
COLOUR_CHANGE_SPEED) {
int changeSgn =
NumberFuncs::SignOf(nextColour.R() - currColour.R());
this->currColour[0] += changeSgn*colourChangeInc;
transitionDone = false;
}
if (fabs(currColour.G() - nextColour.G()) >
COLOUR_CHANGE_SPEED) {
int changeSgn =
NumberFuncs::SignOf(nextColour.G() - currColour.G());
this->currColour[1] += changeSgn*colourChangeInc;
transitionDone = false;
}
if (fabs(currColour.B() - nextColour.B()) >
COLOUR_CHANGE_SPEED) {
int changeSgn =
NumberFuncs::SignOf(nextColour.B() - currColour.B());
this->currColour[2] += changeSgn*colourChangeInc;
transitionDone = false;
}

// If we're close enough to the next colour
// then move on to the next colour
if (transitionDone) {
this->currColourIndex = (this->currColourIndex + 1) %
NUM_COLOUR_CHANGES;
}

cgGLSetParameter3f(this->colourMultParam,
this->currColour[0], this->currColour[1],
this->currColour[2]);
This code acts almost like a very simplified parametric spline - where each of the colours in the COLOUR_CHANGE_LIST array act as points in 3D space (RGB instead of XYZ). Each of the if-statements is responsible for shifting along the line that leads to the next colour point. If you look at the code really closely you'll notice that there are small jumps around the points since the COLOUR_CHANGE_SPEED is not a very small value (it's currently set to around 0.07), these jumps are impossible to see, however, since they too are still quite small.

Thursday, June 12, 2008

The Beginnings of a Game

I recently started to put some serious work into a game, which I'll be calling "Biff! Bam!! Blammo?!!". The game is a glorified version of "Arkanoid", which, I'm aware, has a billion+ copies out there, but I choose this type of game mainly because the game logic is straight forward, which paves the way for more time spent on graphics and exploring interesting game mechanics.

These posts concerning the game are intended to record things that have driven me insane or insights I've gained while working on it. But first here are some pretty pictures:

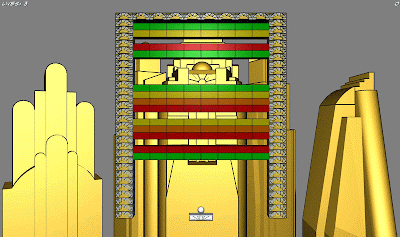
This first picture is of the first 'world' - the game will be split up into worlds, each with its own theme - the theme of this first world being "Deco".


Next is a picture of the same scene but without the game pieces or HUD.


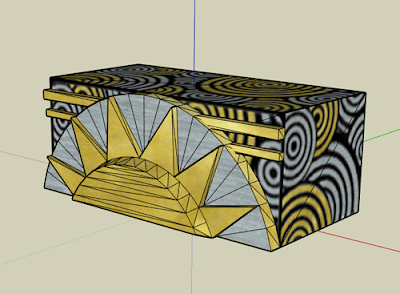
Finally here's a picture of the deco-block mesh that makes up the solid blocks in the Deco world.


Materials

So far I've developed 2 CgFx materials: a basic celshading/toon material and a basic phong material. Both materials have black outlines to remain consistent and to bring out more of the features of the various meshes.

I've designed materials so that they share all uniform and varying parameters - typically these are just various projection, view and world transform matrices, a diffuse sampler, specular colour, diffuse colour, shininess, and light positions/colours. My reasoning behind this is so that I can move all the parameters (in code), up into a superclass for materials. This allows me to abstract any of the game materials, where I may change the parameters of a material without needing to know the material I'm dealing with. Of course, I lose this abstraction if I ever create really complicated materials with unusual parameters - but for the purposes of this game, I doubt I'll have any materials of that sort.

To deal with the CGcontext and other persistent Cg-type objects I created a singleton manager for CgFx - this makes creating, getting, and destroying those objects easy and centralizes that functionality. It also provides a central place to load effects and check for errors in the Cg runtime.

Instancing Issues

Probably the most time consuming and troubling issue I've had so far was dealing with instancing of the blocks/bricks that make up game levels. When I first drew a full level with all of its bricks, CgFx materials included, I had a frame rate of 10... which seemed absolutely ridiculous on a NVIDIA 8800 GT - my goal for this game is to ALWAYS keep the frame rate at 60 fps. So at that point there was much science to be done; I had never dealt with extreme instancing before and I had some ideas of what the problem was...
  • Naive hypothesis: high polygon block meshes

  • Less Naive hypothesis, but still naive: using only one display list many times

  • Partly good hypothesis: overly complicated CgFx shaders (move outline pass out of shader, simplify some of the math)

  • Correct hypothesis: ALL material parameters are being changed for EVERY BLOCK (yikes!)
Obviously the first two hypothesis had little/nothing to do with the problem, the last two, together, had just about everything to do with it - but mostly it was the last. The issue when it comes to instancing is that every instance will have its own transformation, material properties, etc. but the mesh is the same... so in a perfect world why not just draw one mesh many, many times with changed parameters feeding into each respective material? Because it kills your GPU... one of the slowest parts of drawing a material is setting the parameters, especially the transforms - not only is that data being sent to the GPU but its also affecting the entire shader.

I was able to remedy the problem by rendering the entire level as a set of individual display lists for all the blocks, each display list with that block's full world transform set as vertex positions - sure it takes up more memory, but the blocks are really small anyway. Then, as I draw each of the display lists I only set the transform parameters once and the only varying parameter for now is the diffuse colour. This remedy put the frame rate back at 60 fps.

This is obviously NOT a solution that uses "instancing" in the sense of modern GPU instancing (i.e., one that uses the latest and greatest OpenGL extensions for instancing or even using pseudo instancing), but it's certainly a solution that works.

Wednesday, July 4, 2007

Why multiply normals by the inverse transpose?

This question has bugged me for a long time; I can do the math and figure it out but I've never seen the actual methodology behind it:

The Question:
As you transform your models into world/view space using some matrix M you inevitably (either OGL does it for you or you do it yourself) have to transform the normals of that model by the inverse transpose of the matrix M. But why??

The Explanation:
Consider that when we transform the vertexes of a model we are also transforming the vectors tangent to each part of the surface of that model by the same transform. Thus, a vector v, tangent to the surface of our model is transformed by some matrix M. Now, by definition any normal n to a particular part of the surface with tangent vector v must satisfy the following formula
n dot v = 0 (1)

But after transforming v by M we are left with the formula
n dot Mv (2)

This no longer necessarily equals zero and we must figure out a method of properly transforming the normal to meet the requirements of its definition.
Consider that given a matrix M, if we multiply M by its inverse (M-1) we will get the identity matrix (I). Now let's reconsider (2):
nM-1Mv = 0 (3)

In cases where we are dealing with a right handed system we will multiply vectors as if they were column vectors (i.e., matrices must be on the left side of the vector), to do this we simply take (nM-1)T which is equal to (M-1)Tn. Substituting this back into (3) we arrive at the final equation:
(M-1)TnMv = 0 (4)


Thus, through mathematical trickery it becomes evident why one must multiply by the inverse transpose.